AI & Automation
Automatically Log Apple Pay Transactions in Lode
With iOS Shortcuts, you can automatically save Apple Pay purchases to Lode right after you tap to pay. On iOS 27 you can download the automation ready-made.
This setup uses Lode's Add Transaction shortcut action. It reads the Apple Pay amount, merchant, and date from the Wallet automation, then creates an expense in Lode and tries to match the category automatically.
Requirements
iPhone with
iOS 18or laterApple Pay set up with at least one card
LodeinstalledAt least one account already created in Lode
iPad and Mac are not supported: the automation fires when a card is tapped, which needs the NFC hardware only an iPhone has.
Quick setup (iOS 27 and later)
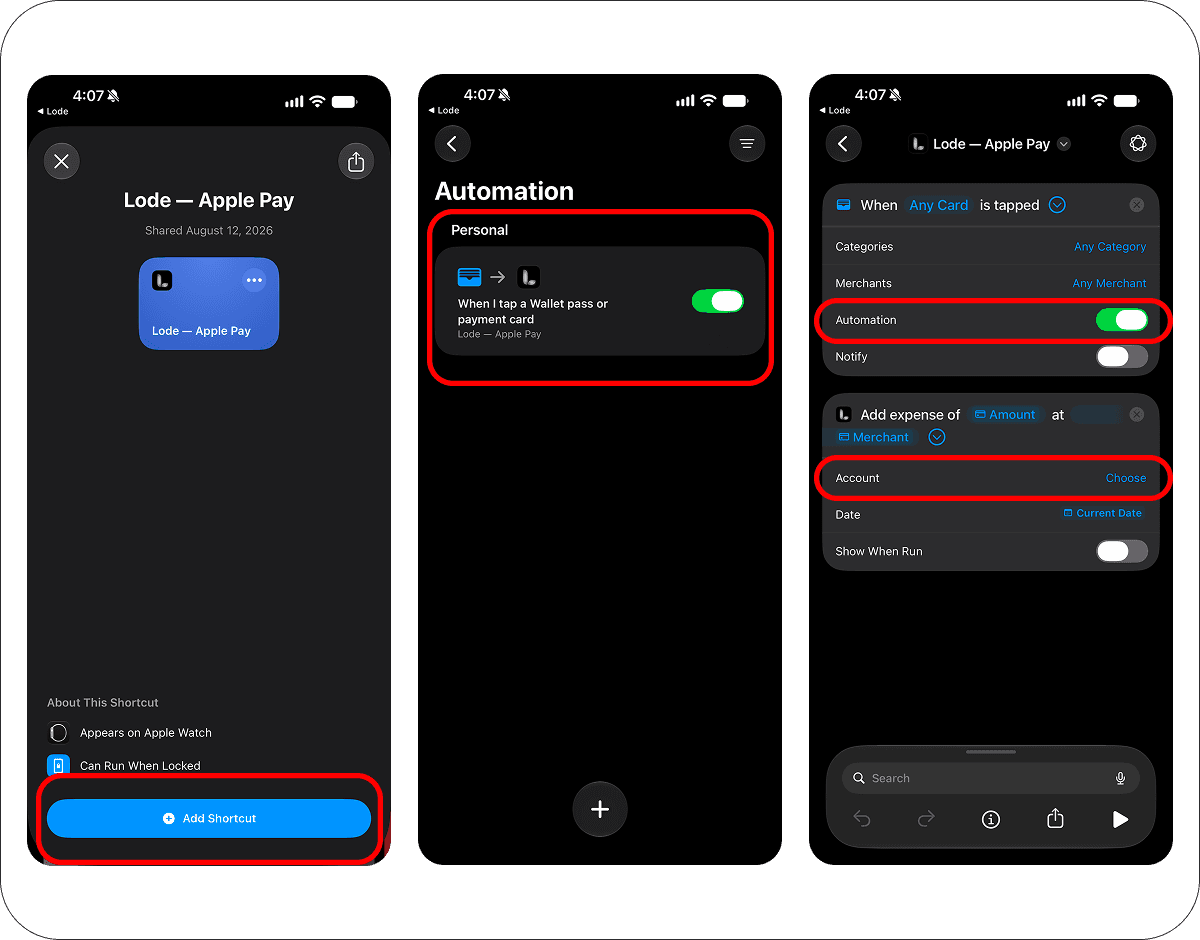
On iOS 27 an automation is a shortcut with a trigger inside it, which means the whole thing can be handed over ready-made. You can also open this straight from the app: Settings → Apple Pay Setup.
Open
Lode — Apple Payon your iPhone and tapAdd Shortcut.It arrives switched off. In
ShortcutsopenLibrary → Automationand turn it on.If you keep several accounts in Lode, open the
Add Transactionaction and setAccountto the one this card belongs to. With a single account it is picked automatically. You can also narrow the trigger fromAny Cardto specific cards.
The ready-made automation already has the amount, merchant and date mapped, runs immediately, and stays silent — nothing else to configure.
iOS 27 only. On earlier versions the file still imports, but the payment values arrive as Unknown Variable and nothing is logged — those versions store the trigger differently. On iOS 18–26 use the manual setup below.
Paying with more than one card? Download it once per card, then narrow each copy to a single card and set its account.
Manual setup (iOS 18–26)
These steps describe the Shortcuts app before iOS 27, where automations live in their own tab. On iOS 27 use the quick setup above.
Step 1. Create a new automation
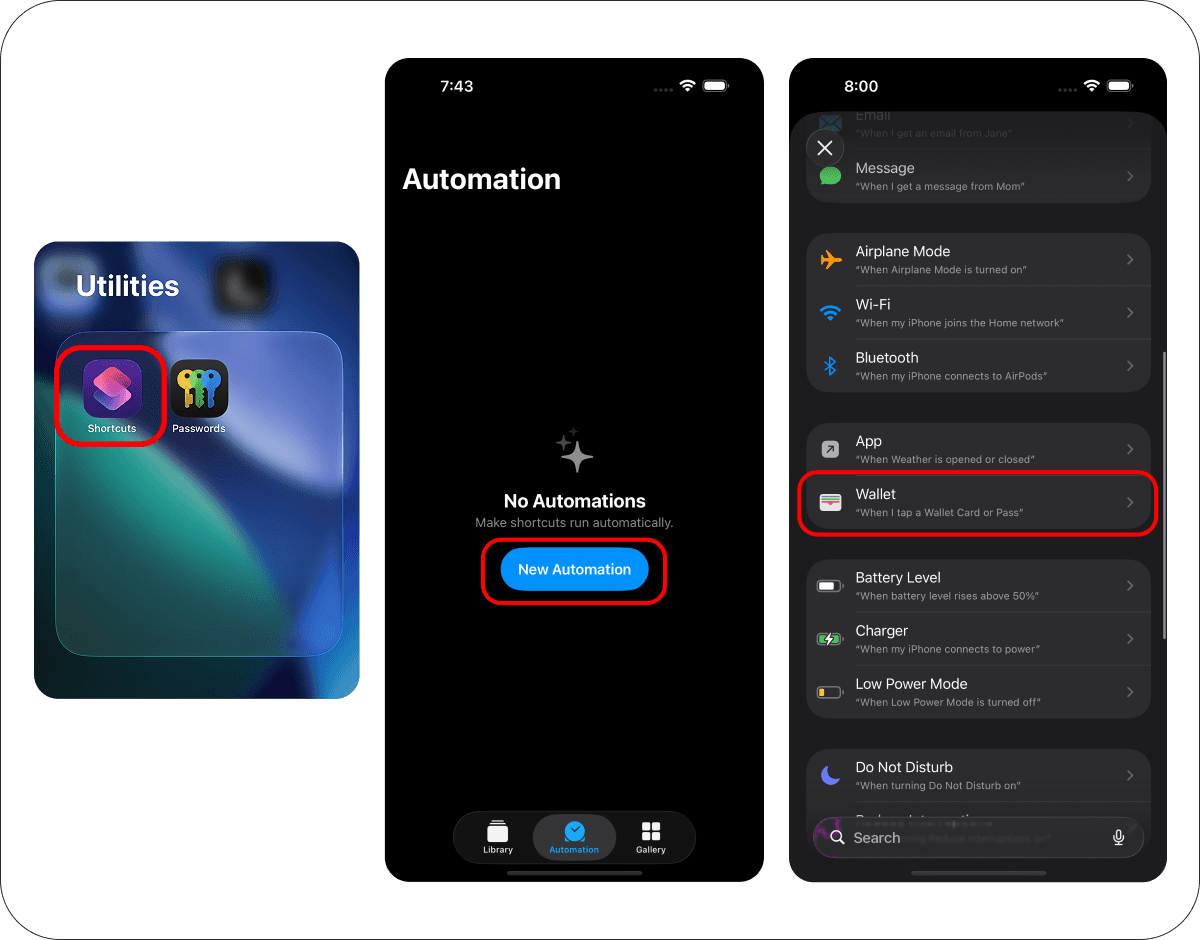
Open the
Shortcutsapp on your iPhone.Open the
Automationtab.Tap
+.Select
Wallet.
Step 2. Choose the Wallet trigger
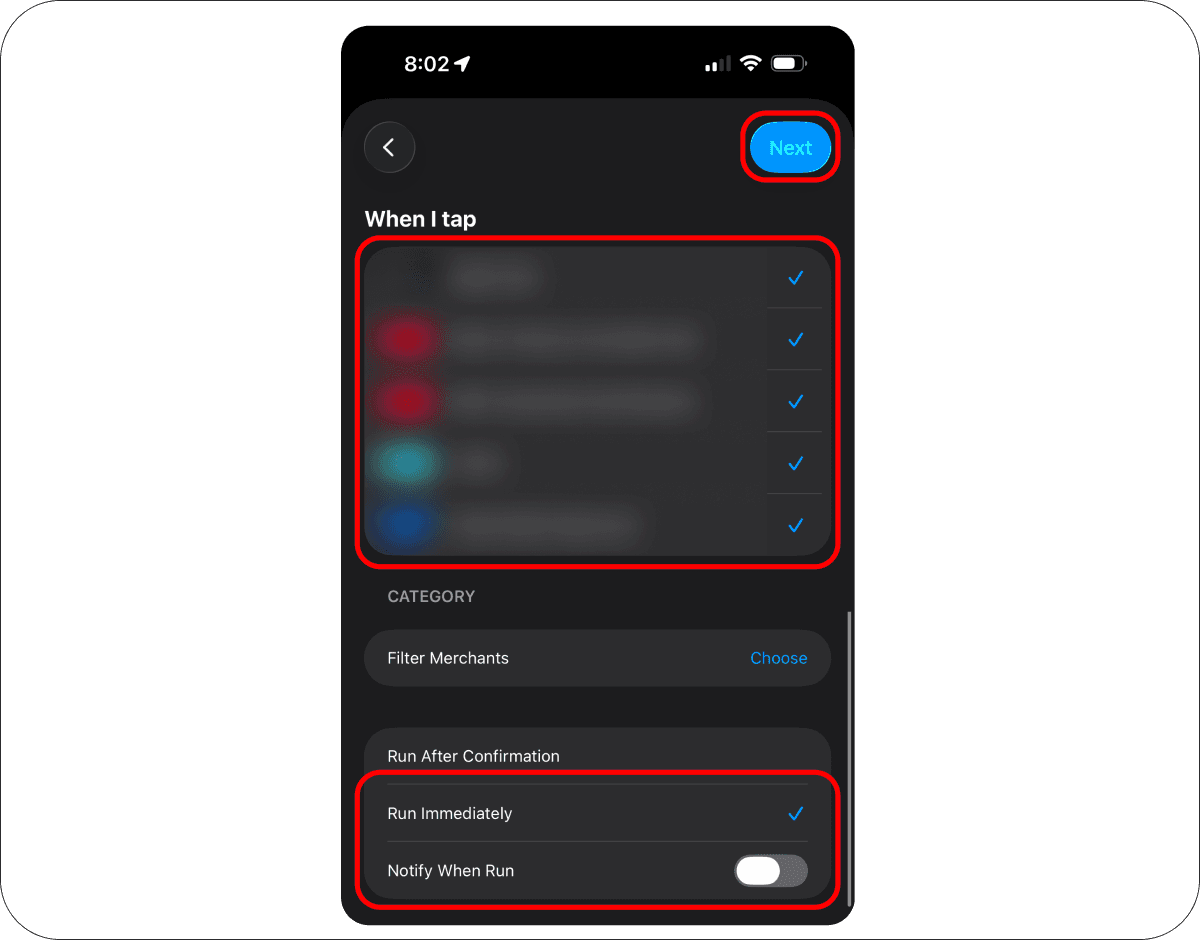
Select the card you want to track.
Select the payment categories you want the automation to react to.
Set the automation to
Run Immediately.Turn off
Notify When Run.Tap
Next.
Step 3. Add the Lode action
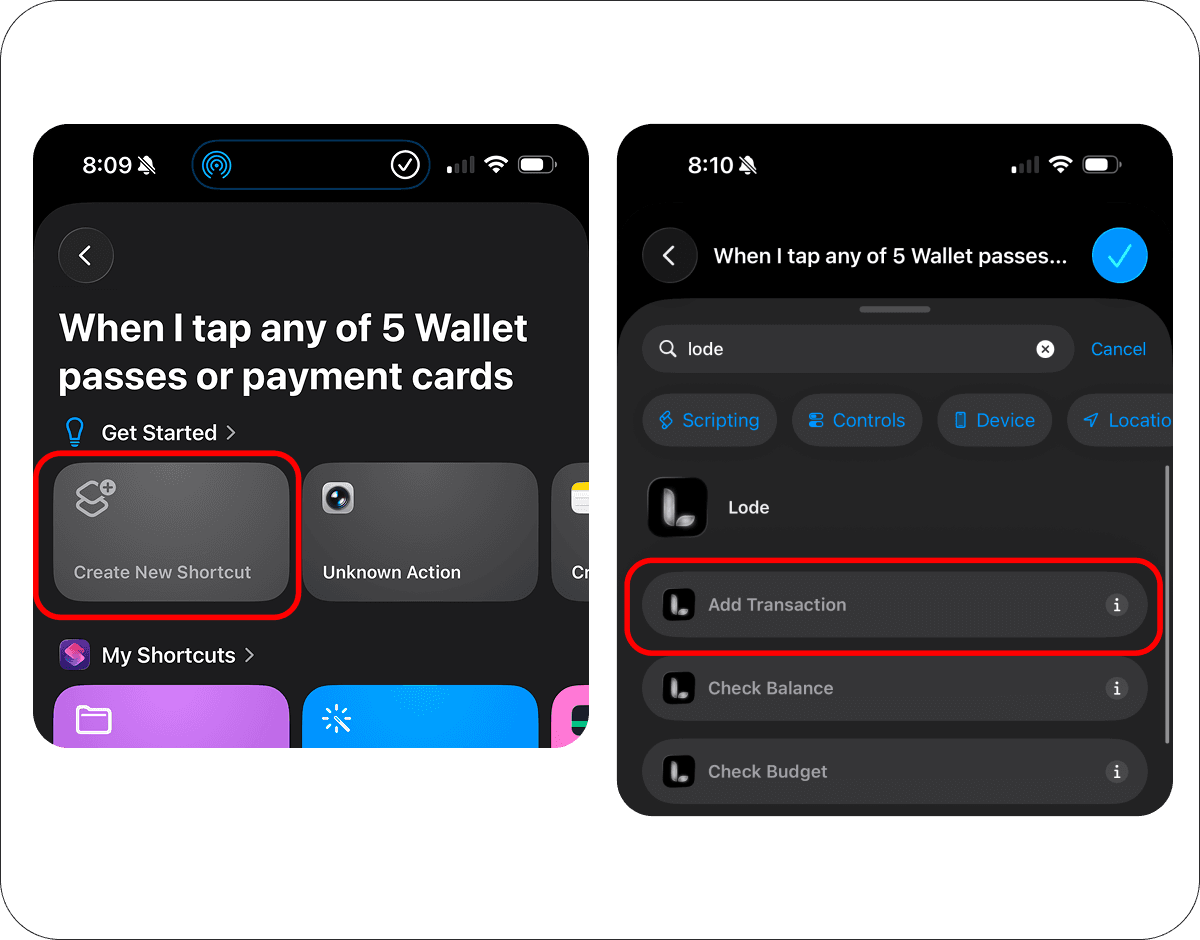
Tap
Create New Shortcut.Search for
Lode.Select
Add Transaction.
Step 4. Pass the Apple Pay data to Lode
Now map the Wallet values into the Lode action.
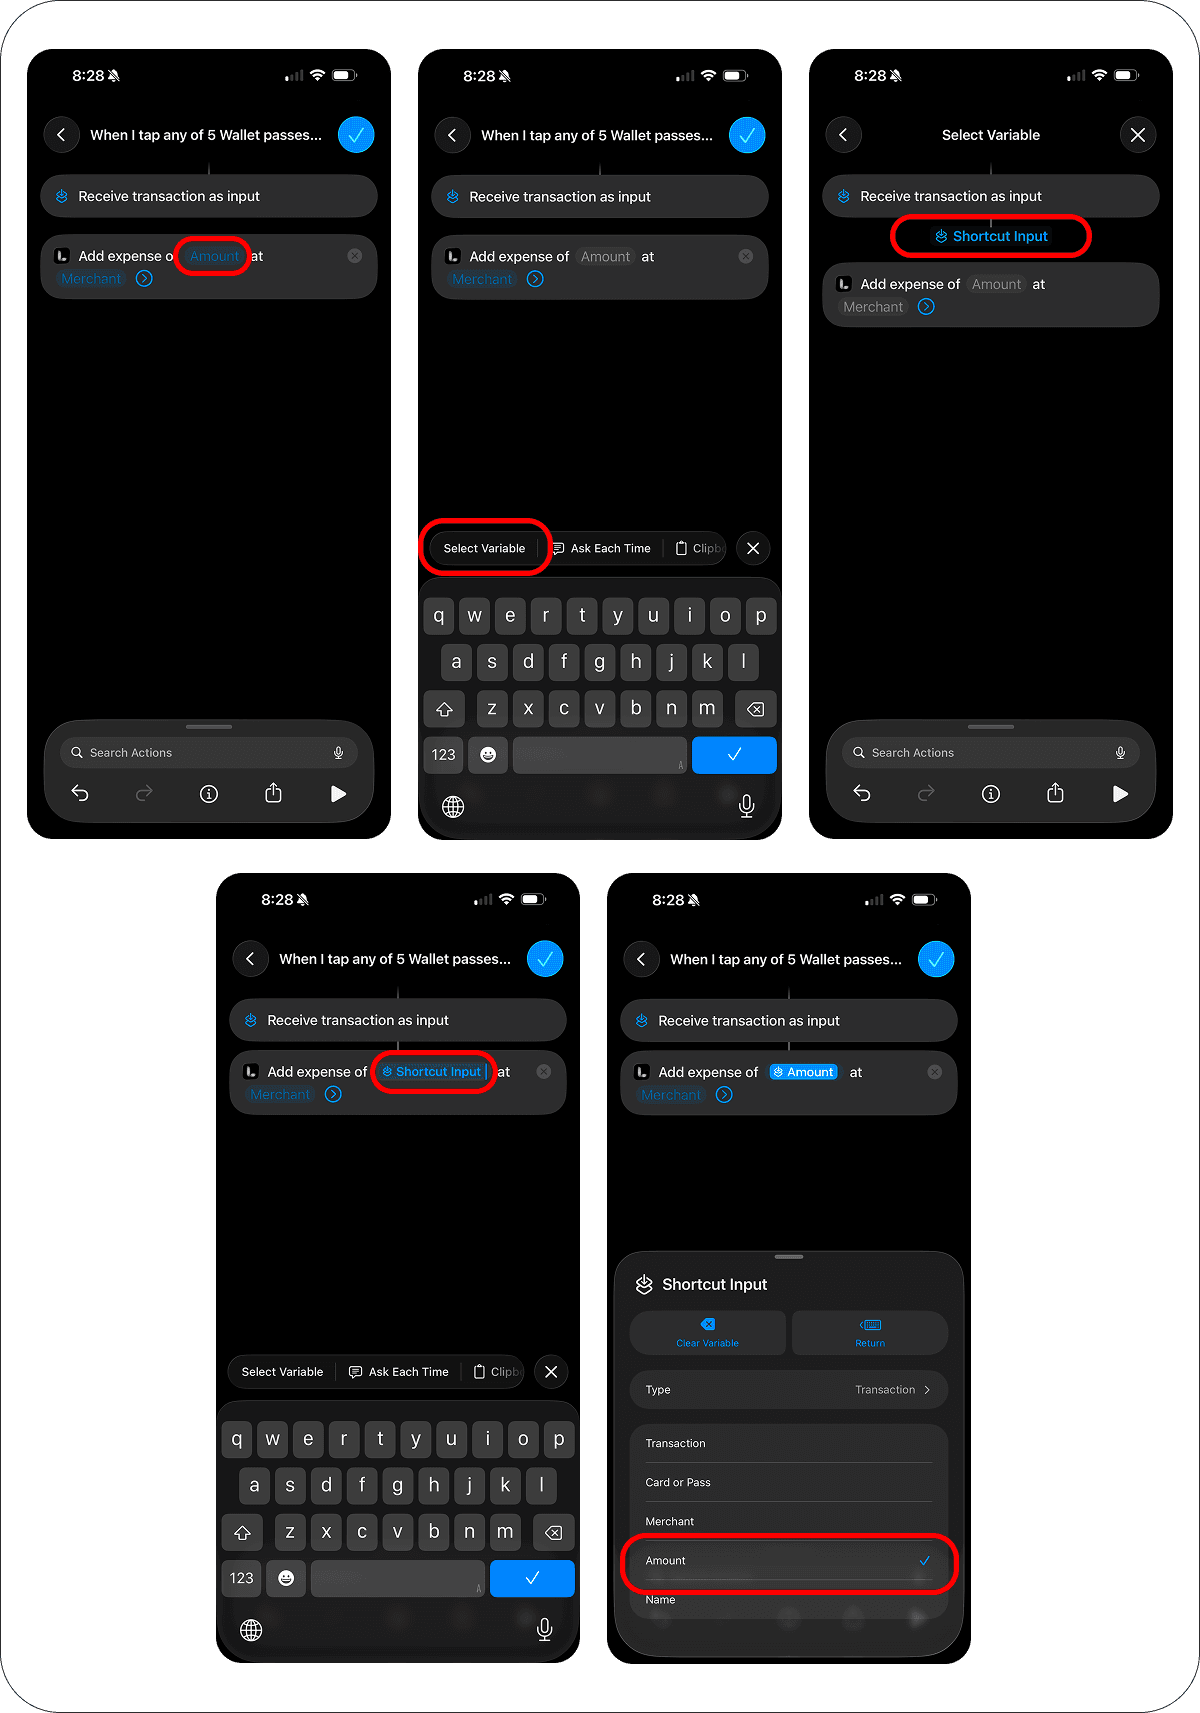
Set Amount:
Tap the
Amountfield.Tap
Select Variable.Choose
Shortcut Input.Tap
Shortcut Inputagain and selectAmount.
Set Merchant:
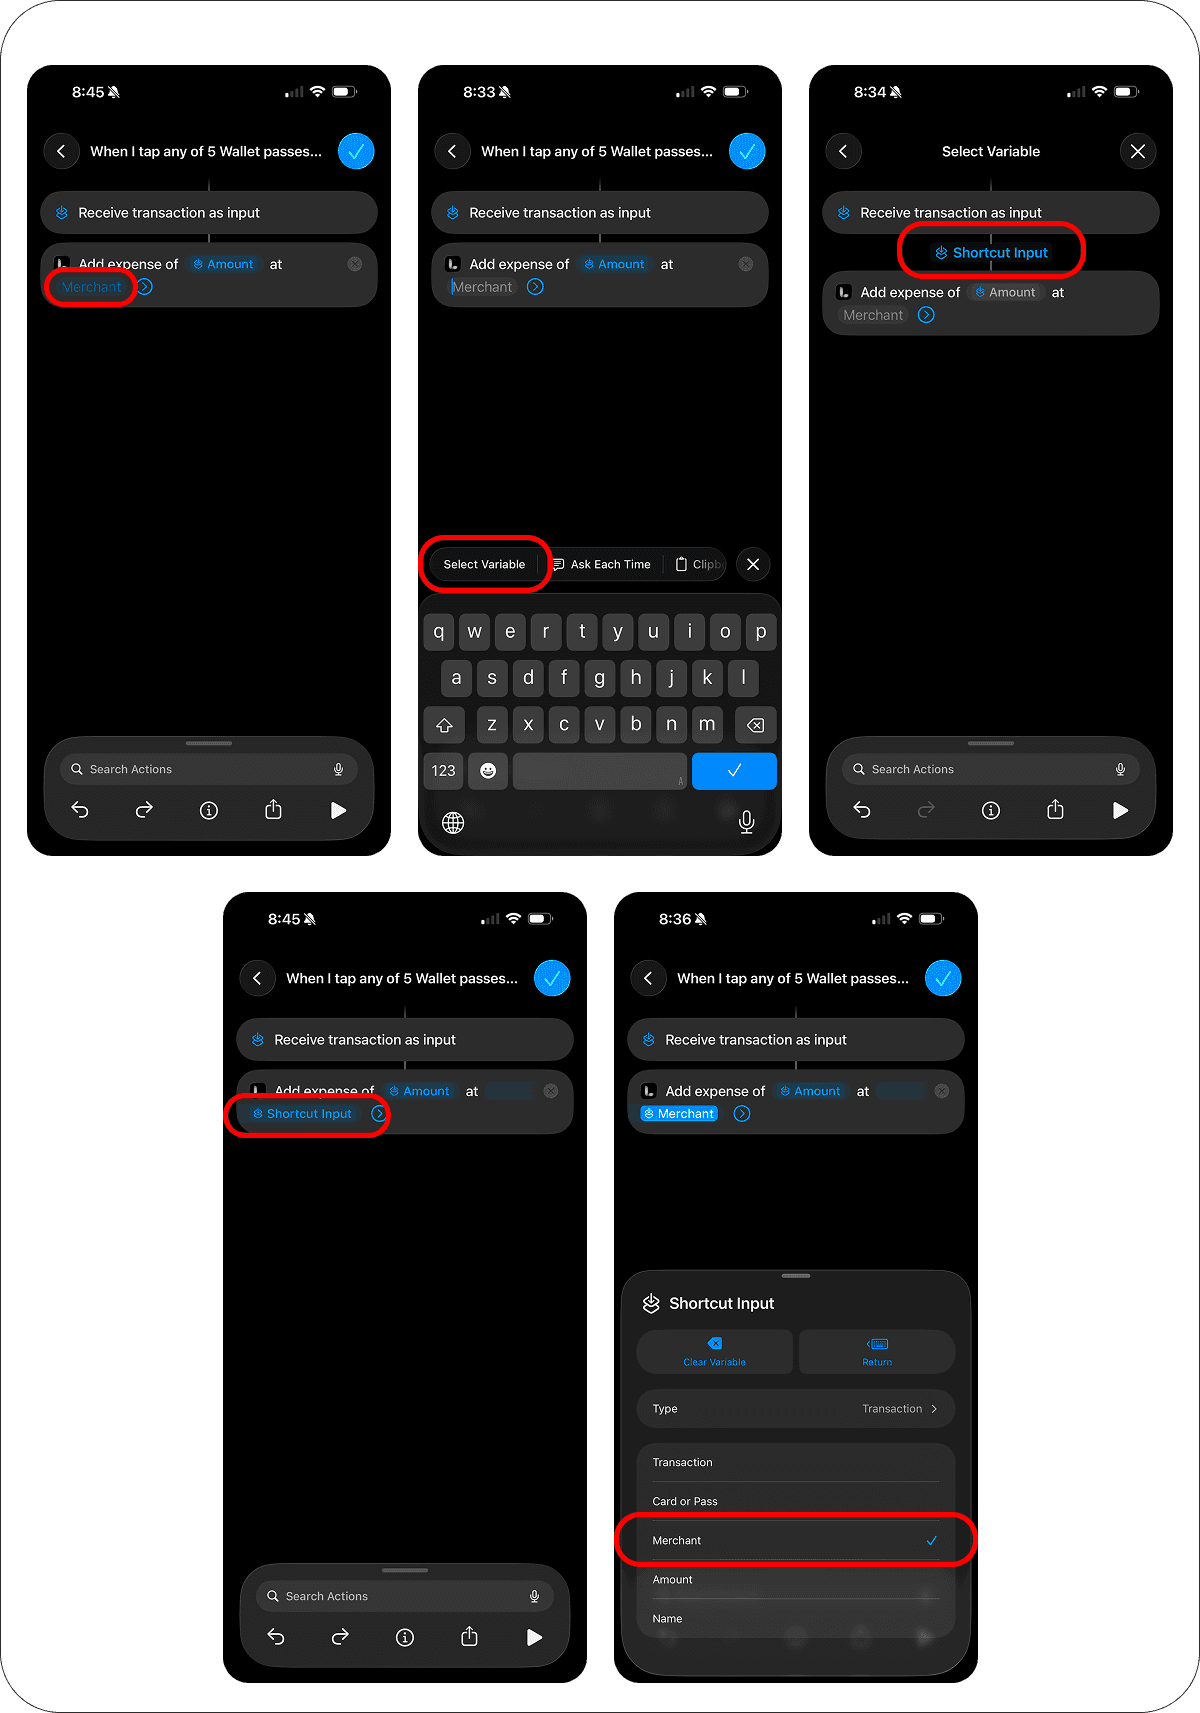
Tap the
Merchantfield.Tap
Select Variable.Choose
Shortcut Input.Tap
Shortcut Inputagain and selectMerchant.
Set Date:
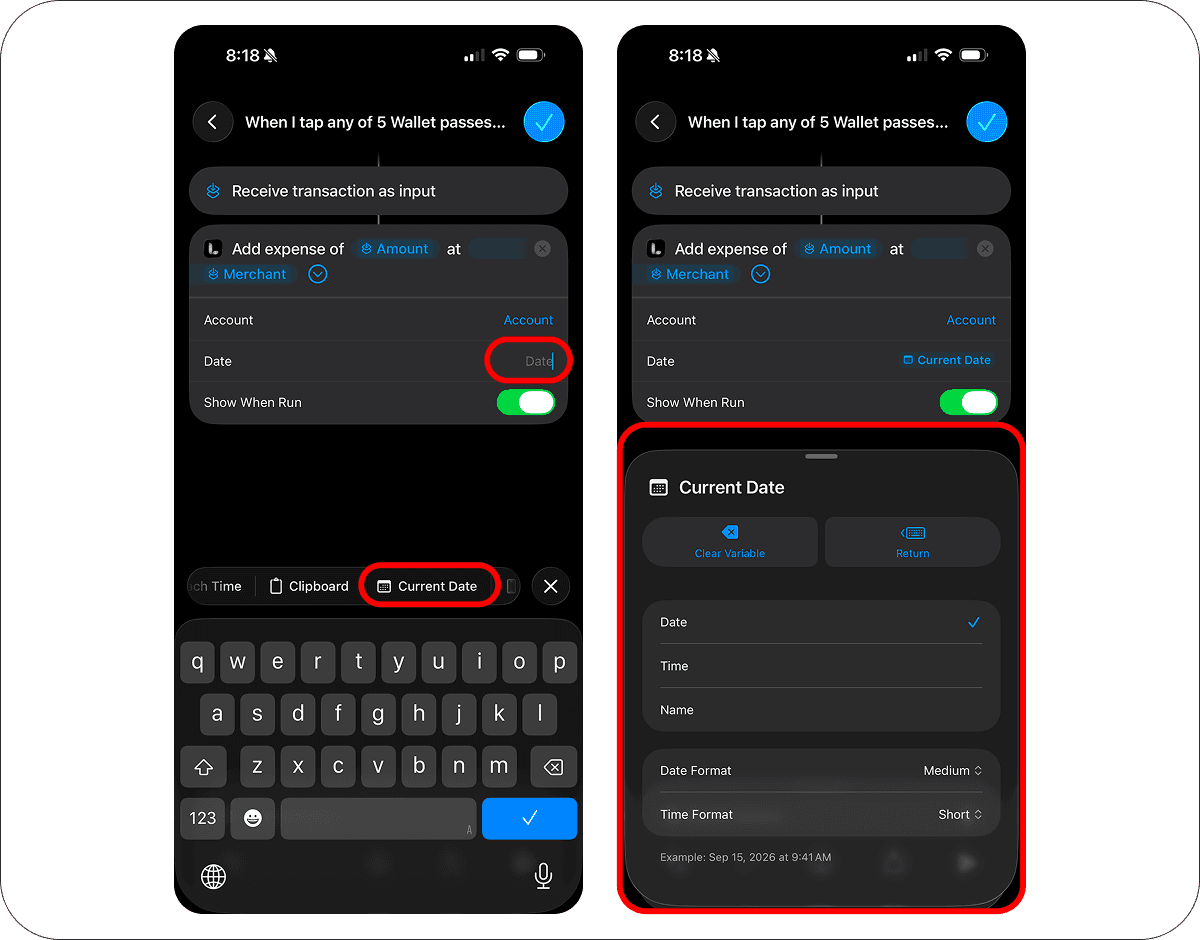
Tap the
Datefield.Tap
Current Date.Leave the
Default settings.
Set Account:
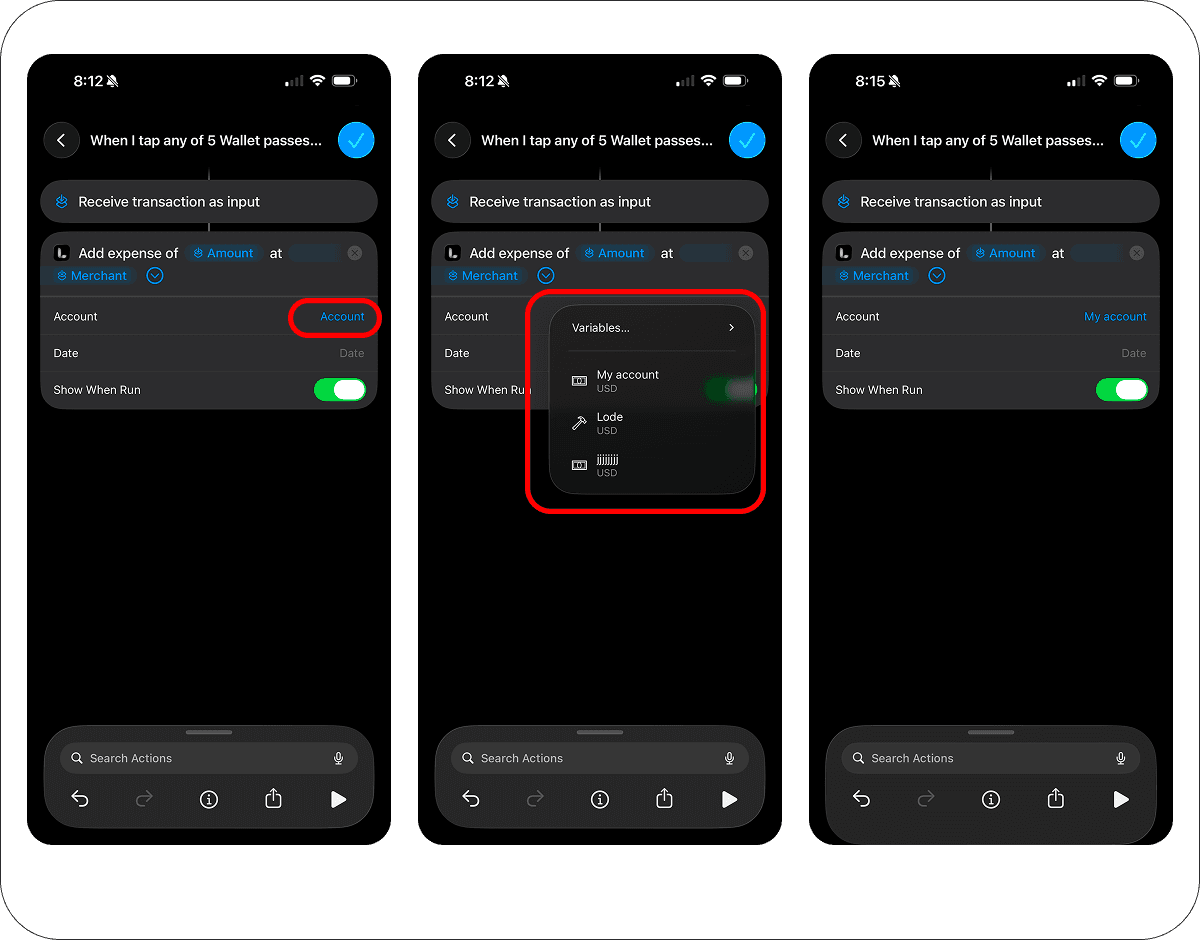
Tap the
Accountfield.Choose the Lode account that matches this card.
This step is important. Setting the account manually is the most reliable setup.
Step 5. Final shortcut settings
Show When Run is optional. It controls whether you see a confirmation after each payment:
Off — Lode logs the transaction silently in the background (recommended for hands-free tracking).
On — you get a confirmation each time you pay.
Either way the transaction is saved.
Tap Done to save the shortcut.
Tap Done again to save the automation.
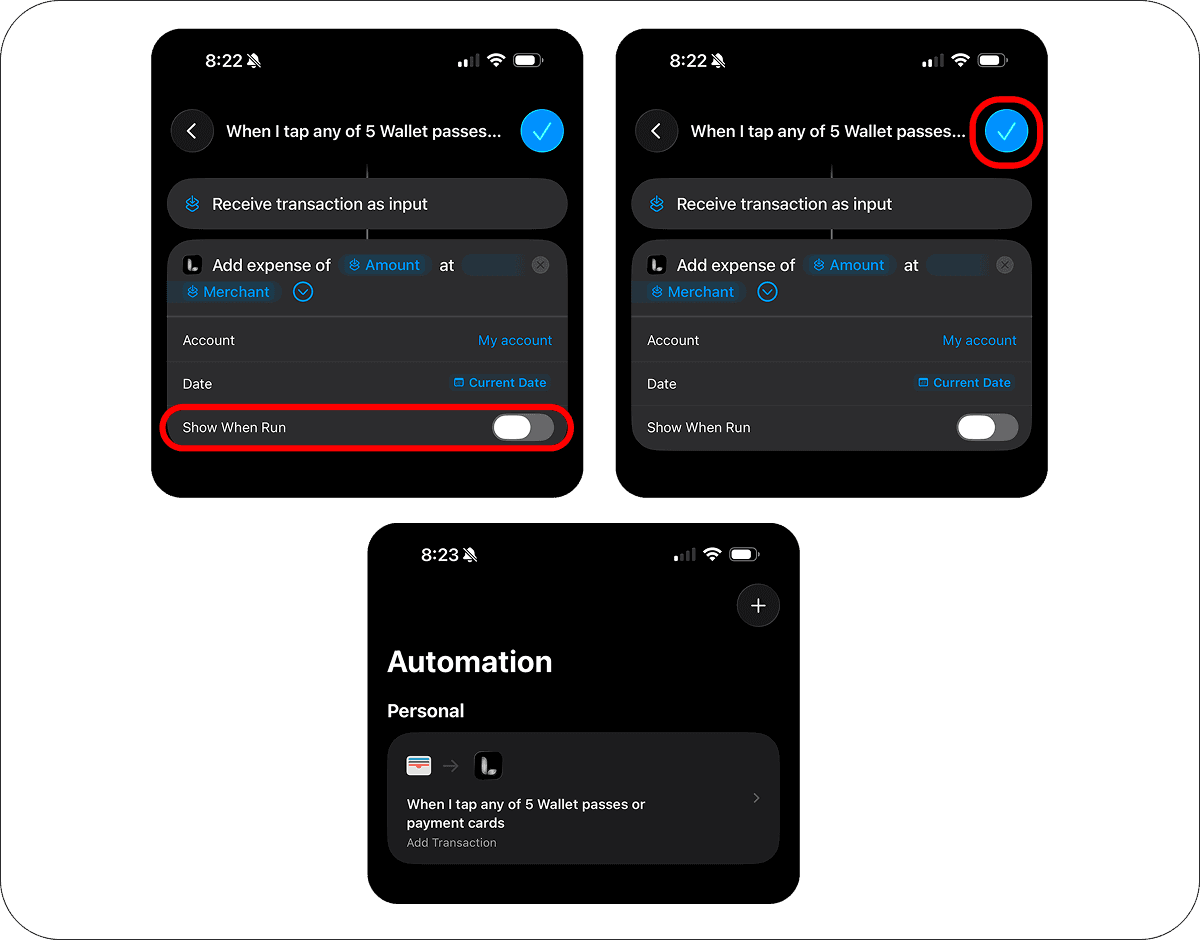
You're all set. The next time you pay with Apple Pay using that card, Lode will try to save the transaction automatically.
How it works
Every time you pay with Apple Pay using the selected card:
The Wallet automation runs automatically.
Apple Pay sends the transaction data into the
Add Transactionaction.Lode reads the amount, infers the currency when possible, and uses your selected account as the fallback currency.
Lode uses the merchant name to pick the closest matching expense category.
Lode saves the transaction to the account you selected.
If the automation fires twice for one payment, Lode skips the duplicate — as long as the two arrive within about two minutes of each other.
If the merchant cannot be matched confidently, Lode falls back to the closest available expense category.
Notifications
A silent automation has no screen of its own, so Lode's notification is the only thing you see. It reports the account, the amount, the merchant and the category it chose, and tapping it opens that exact transaction.
It also tells you when a payment was not saved — an amount it could not read, or a cross-currency payment once the free monthly conversions are used up. Without notifications those failures are invisible and your ledger is quietly wrong, so allow them when Lode asks, or turn them on in Settings → Apple Pay Setup.
Tips
Create one automation per card and set the
Accountfield explicitly in each one.Setting the Account field explicitly is the most reliable setup — Lode does not read your Wallet card name.
Unlock your iPhone before tapping to pay. Wallet automations are more reliable when the phone is already unlocked.
Important notes
This setup creates
expensetransactions only.Category selection is based on the merchant name and your existing expense categories in Lode.
If the account currency differs from the payment currency, Lode will try to convert the amount before saving. On the free plan this uses your monthly free conversions — if they're used up, the transaction won't be saved until you upgrade to Premium or use an account in the same currency as the card.
Some merchants, terminals, online checkouts, or card providers may not trigger the Wallet automation consistently. This is a Shortcuts limitation, not a Lode-specific one.
Troubleshooting
Nothing happens after importing the ready-made automation
An imported automation is switched off until you turn it on. Open
Library → Automationin Shortcuts and check its switch.The ready-made automation needs
iOS 27. On earlier versions the payment values show asUnknown Variable— set it up manually instead.
The automation does not run
Make sure the automation is set to
Run Immediately.Make sure
Notify When Runis turned off and the automation is enabled.Unlock your phone before paying.
Check that you paid with the same card selected in the automation.
Test again with an in-store Apple Pay payment. Some online flows do not trigger Wallet automations reliably.
The transaction is not saved
Make sure the shortcut action is
Add Transaction.Check that the
Amountfield is mapped fromShortcut Input -> Amount.Open Lode and verify that at least one account exists.
The wrong account is used
Open the shortcut and set the
Accountfield manually to the correct Lode account.If you leave
Accountempty, Lode uses the first available account, which may be the wrong one. Always set Account manually.
The wrong category is used
Lode chooses a category from your existing expense categories based on the merchant name.
Rename categories to be clearer if similar merchants keep landing in the wrong place.
The amount or currency is wrong
Re-check that
Amountis mapped toShortcut Input -> Amount.Check that the selected
Accountin Lode uses the currency you expect for this card.
Questions? Reach out — we're happy to help.